* TIL/개념: 최대한 공식 문서 & 책을 기반으로 배운 내용을 정리
* 현재 취준생으로 풋내기 개발자가 쓰는 글입니다.
* 그러니 조언과 지적 및 훈수는 언제나 환영입니다! 댓글로 많이 달아주세요!
개인 프로젝트에서 Notification을 적용하기 위해 찾아본 공식 문서 & 겪은 이슈를 정리
Android Notification
Notification이란?
사용자에게 알림을 줄 때 Android에서는 Notification 기능을 사용한다.
Notification은 단순 알림 기능을 넘어서서, 메시지 답변처럼 상호작용까지 가능하도록 지원한다.

그 밖에 지원하는 기능에 대해서는 여기 공식 문서를 참고할 것!
(요 포스팅에서는 기본적인 지식만 다룰 생각이다.)
Notification 구성

- 작은 아이콘 - 필수, setSmallIcon()
- 앱 이름 - 시스템에서 제공
- 타임 스탬프 - 시스템에서 제공하지만 setWhen()로 재정의하거나 혹은 setShowWhen(false)로 숨길 수 있음
- 큰 아이콘 - 선택 사항, setLargeIcon()으로 설정
- 제목 - 선택 사항, setContentTitle()으로 설정
- 텍스트 - 선택 사항, setContentText()로 설정
작은 아이콘만 필수로, 나머지는 선택 사항이다.
Notification Channel
Android 8.0부터는 모든 알림에 채널을 할당해야 한다.
하나의 앱은 여러 알림의 채널을 보유하고, 앱에서 보내는 알림의 각 유형에 별도의 채널을 할당할 수 있다.

Android 8.0 이상에서는 채널을 통해서 알림의 중요도를 지정할 수 있다.
- 중요도란?
- Android에서는 알림의 중요도를 사용해서 알림이 사용자의 시각적 혹은 청각적으로 방해하는 수준을 결정
- 중요도가 높을수록 알림이 사용자를 방해하는 수준도 높아짐
- 채널의 importance에 따라 결정되며, 사용자는 시스템 설정에서 알림 채널의 중요도를 변경할 수 있음.
- 중요도 수준
- 긴급: 알림음이 울리며 헤드업 알림으로 표시
- 높음: 알림음이 울림
- 중간: 알림음이 없음
- 낮음: 알림음이 없고, 상태 표시줄에 표시되지 않음
- 중요도와 상관없이 모든 알림은 사용자를 방해하지 않는 시스템 UI 위치에 표시된다.
Android 7.1 이하에서는 앱 하나당 하나의 채널을 가지게 되며,
알림의 중요도는 알림의 priority에 따라 결정짓게 된다.
그럼 채널은 언제 만들어야 할까?
Notification 을 띄워주기 전 채널이 등록되어야 하기 때문에, 그 전에 반드시 만들어주어야 한다.
아니면 알림 자체가 안 뜬다.
공식 문서에는 앱이 시작하자마자 이 코드를 실행해야 하며,
기존 채널을 또 만들게 되면 아무 작업도 실행되지 않기 때문에 반복적으로 호출하는 것이 안전하다고 알려준다.
+) 그래서 실제 프로젝트에 적용할 땐 아래처럼 Application 클래스에서 초기화 시켜주었다.
(밑에서 설명할) 알림 권한 등을 고려하면 채널을 알림 기능을 사용하기 직전에 만들어주어도 되지만,
생각해보면 위 앱화면에서 보이는 중간에 빠빰 하고 채널이 생기면 뭔가..이상할 것 같다는 생각..(알림 채널 자체가 앱의 정보라고 생각이 들어서..??)
사용했던 앱이 처음에 알림 채널을 만들고 허용을 묻는 것도 고려해서 위치는 여기에 두었다.
@HiltAndroidApp
class HabitTrackerApplication : Application() {
    override fun onCreate() {
        super.onCreate()
        // ...
        createNotificationChannels()
    }

    private fun createNotificationChannels() {
        // ...
    }
}
POST_NOTIFICATIONS
Android 13이상부터는 Notification 정책이 바뀌어서
런타임 권한에 POST_NOTIFICATIONS가 추가되고,
알림 권한을 요청하는 시기를 앱에서 제어할 수 있게 되었다.
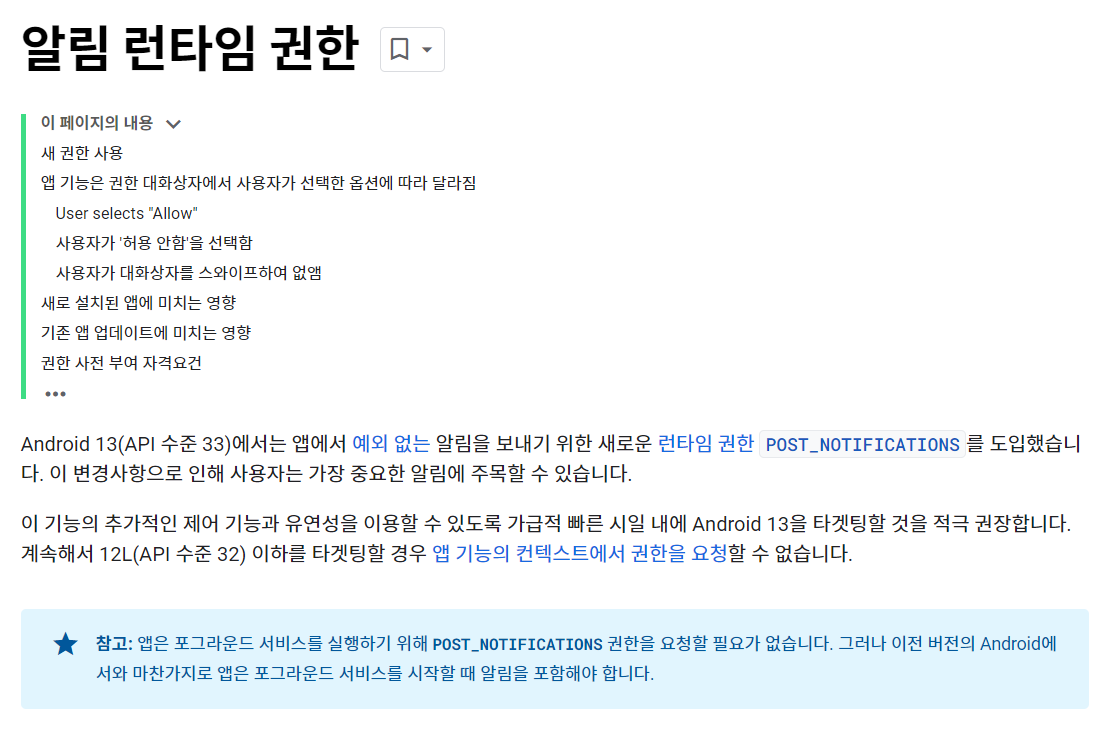
Android 13 이상에는 앱 설치 시에 알림이 기본적으로 꺼져 있기 때문에
앱에서 직접적으로 권한을 요청하지 않으면
사용자가 직접 앱 설정에 들어가서 알람 설정을 바꾸기 전까지 알림이 띄워지든 말든지 모른다.
때문에 사용자가 알림 기능을 사용하려고 할 때는 권한을 확인하고 메시지를 띄워주는 작업이 필요하다.
- Android 13 이상에서는 직접 메시지를 만들어서 설명하고, 권한을 부여하도록 권장
- Android 12 이하는 알림 채널을 만든 후 시작할 때 권한 대화상자를 표시한다.
구현
그럼 다음과 같은 요구사항이 있다고 가정하고, 구현 방법을 살펴보자.
- 버튼을 클릭하면 Notification을 띄워준다.
- 알림을 탭하면 FirstActivity에서 SecondActivity로 이동한다.
알림을 띄우기 전, 알림 채널을 만들어야 한다.
고유한 채널 ID, 사용자가 볼 수 있는 이름, 중요도 수준을 사용해 NotificationChannel 객체를 만들어서
createNotificatoinChannel()을 호출한다.
    private fun createNotificationChannel() {
        // Android 26 이상부터 채널 만들기
        if (Build.VERSION.SDK_INT >= Build.VERSION_CODES.O) {

            val name = "알람 테스트 제목"
            val descriptionText = "알람 테스트 설명"
            val importance = NotificationManager.IMPORTANCE_DEFAULT // 중요도 설정
            val channel = NotificationChannel(CHANNEL_ID, name, importance).apply {
                description = descriptionText
            }

            // NotificationManager 를 호출하여 채널 생성
            val notificationManager: NotificationManager =
                getSystemService(Context.NOTIFICATION_SERVICE) as NotificationManager
            notificationManager.createNotificationChannel(channel)
        }
    }
POST_NOTIFICATIONS 권한을 AndroidMainfest.xml에 추가한다.
<manifest xmlns:android="http://schemas.android.com/apk/res/android"
    xmlns:tools="http://schemas.android.com/tools">

    <uses-permission android:name="android.permission.POST_NOTIFICATIONS" />
    // ...

</manifest>
그리고 버튼을 클릭했을 때 권한을 확인한 후, showNotification()을 호출한다.
    override fun onCreate(savedInstanceState: Bundle?) {
        super.onCreate(savedInstanceState)
        binding = ActivityFirstBinding.inflate(layoutInflater)
        setContentView(binding.root)

        createNotificationChannel()

        binding.button.setOnClickListener {
            checkNotificationPermission()
        }
    }

    // 권한 요청 Launcher
    private val requestNotificationPermissionLauncher = registerForActivityResult(
        ActivityResultContracts.RequestPermission()
    ) { isGranted ->
        if (isGranted) {
            // 권한 허용 시
            showNotification()
        } else {
            // 거절 시
            showPermissionDenySnackBar()
        }
    }

    // 이미 권한을 허용한 경우인지 확인
    private fun isAlreadyGranted(permission: String) =
        ContextCompat.checkSelfPermission(
            this,
            permission
        ) == PackageManager.PERMISSION_GRANTED

    // 이전에 권한 요청을 거절한 경우인지 확인
    private fun isRationale(permission: String) =
        ActivityCompat.shouldShowRequestPermissionRationale(this, permission)

    // Notification 권한 확인
    private fun checkNotificationPermission() {
        when {
            // 이미 허용했으면 Notification 띄우기
            isAlreadyGranted(POST_NOTIFICATIONS) -> showNotification()
            // 이전에 이미 거절했으면 다이얼로그 띄우기
            isRationale(POST_NOTIFICATIONS) -> showRationaleAlertDialog()
            // 처음일 때
            else -> {
                // POST_NOTIFICATIONS 권한이 런타임 권한에 추가된 TIRAMISU 버전 이상이면
                if (Build.VERSION.SDK_INT >= Build.VERSION_CODES.TIRAMISU) {
                    // 권한 요청
                    requestNotificationPermissionLauncher.launch(POST_NOTIFICATIONS)
                } else {
                    // 다이얼로그 띄우기
                    showRationaleAlertDialog()
                }
            }
        }
    }

    // 권한이 왜 필요한지 설명 후 설정하기에서 권한 변경 권장
    private fun showRationaleAlertDialog() {
        MaterialAlertDialogBuilder(this)
            .setTitle("휴대폰 알림 설정이 꺼져 있어요")
            .setMessage("설정 페이지에서 먼저 알림 허용을 해주세요")
            .setNeutralButton("취소") { _, _ ->
            }.setPositiveButton("설정하기") { _, _ ->
                openAppSetting() // 설정하기로 이동
            }.show()
    }

    // 무시했을 경우 띄워줄 Snackbar
    private fun showPermissionDenySnackBar() {
        Snackbar.make(
            binding.root,
            "권한이 허용되어야 알림 설정이 가능해요!",
            Snackbar.LENGTH_SHORT
        ).show()
    }

    // 앱 설정 페이지로 이동
    private fun openAppSetting() {
        val intent = Intent(Settings.ACTION_APPLICATION_DETAILS_SETTINGS)
            .setData(Uri.parse("package:${BuildConfig.APPLICATION_ID}"))
        startActivity(intent)
    }
private fun showNotification() {
/**
* 1. Intent 설정: SecondActivity로 이동
* */
val intent = Intent(this, SecondActivity::class.java).apply {
flags = Intent.FLAG_ACTIVITY_NEW_TASK or Intent.FLAG_ACTIVITY_CLEAR_TASK
}
// FLAG_ACTIVITY_NEW_TASK -> 앱의 기존 작업 및 백스택에 추가되는 대신 새 작업을 시작
// FLAG_ACTIVITY_CLEAR_TASK -> 백스텍이 생성되어 뒤로 및 위로 버튼에 관한 사용자의 기대가 유지
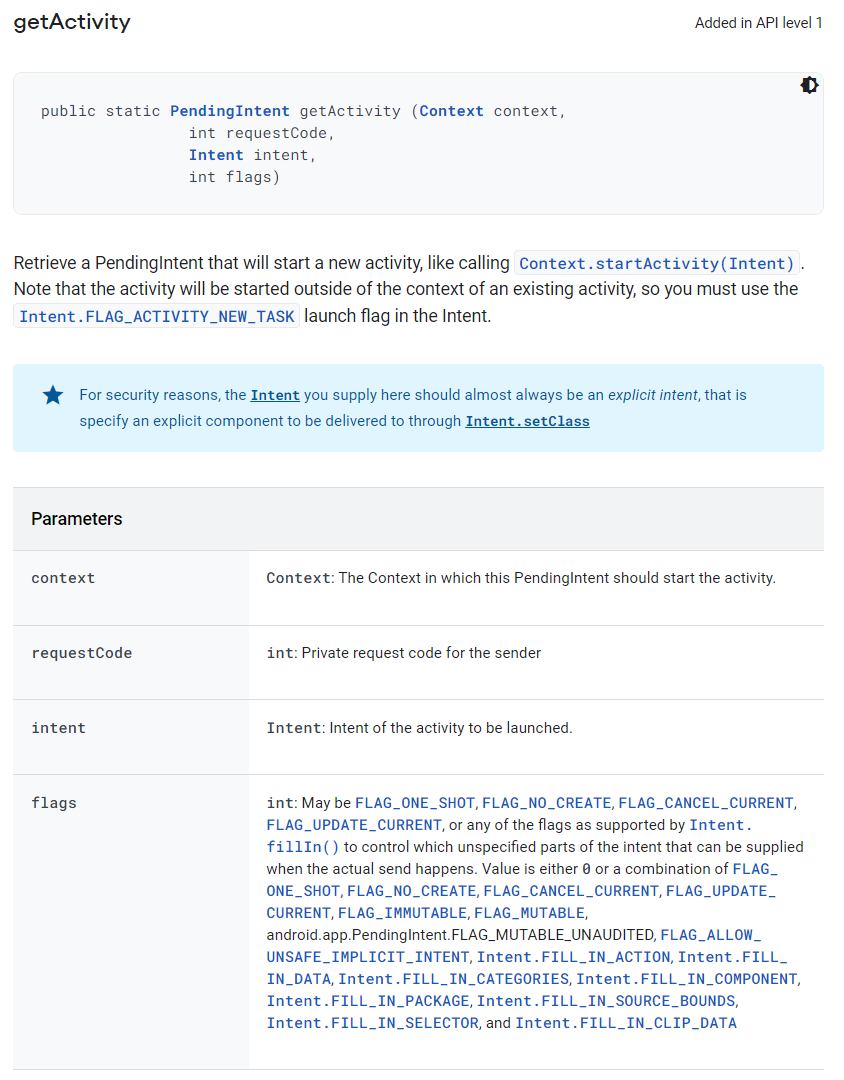
val pendingIntent: PendingIntent =
PendingIntent.getActivity(this, 0, intent, PendingIntent.FLAG_IMMUTABLE)
/**
* 2. Notification 구성
* */
val builder = NotificationCompat.Builder(this, CHANNEL_ID)
.setSmallIcon(R.drawable.ic_launcher_foreground)
.setContentTitle("My notification")
.setContentText("Hello World!") // 알림 구성 설정
.setPriority(NotificationCompat.PRIORITY_DEFAULT) // 우선순위 설정
.setContentIntent(pendingIntent) // Intent 설정(탭 시 해당 intent로 이동)
.setAutoCancel(true) // 알림을 탭하면 자동으로 알림 삭제
.setCategory(NotificationCompat.CATEGORY_MESSAGE)
// 시스템 전체 카테고리 설정
// -> 방해 금지 모드 설정했을 때 해당 Notification의 Category 설정
// ex. CATEGORY_ALARM, CATEGORY_REMINDER, CATEGORY_EVENT 또는 CATEGORY_CALL
/**
* 3. Notification 보여주기
* */
val notificationId = "${System.currentTimeMillis()}".hashCode()
with(NotificationManagerCompat.from(this)) {
// notificationId is a unique int for each notification that you must define
notify(notificationId, builder.build())
}
}- Intent 설정
- 알림을 탭했을 때 SecondActivity로 이동하기 위한 Intent를 설정한다.
- 이 때는 Intent 뿐만 아니라 PendingIntent를 사용한다.
- Intent는 SecondActivity에 이동하되, flag와 같은 메시지를 전달하는 역할
- PendingIntent는?
- Intent처럼 어디에 전달되는 것은 맞다.
- 공식 문서에는 다음처럼 나와있다.
- 소유하는 애플리케이션의 프로세스가 종료되더라도 PendingIntent 자체는 제공된 다른 프로세스에서 계속 사용할 수 있습니다.
- 즉 앱의 프로세스가 꺼져있는 상황에서 Notification을 탭해서 어딘가로 이동하려면 PendingIntent가 필요하다.
- Notification 구성
- builder 패턴을 사용한다.
- 맨 처음 context와 고유 채널ID를 넘긴다.
- 그리고 setSmallcon, setContentTitle, setContentText를 이용해 아이콘, 제목, 본문 텍스트를 설정한다.
- setPriority를 사용해서 우선순위를 설정한다.
- 우선순위에 따라 Android 7.1 이하에서 얼마나 강제적이어야 하는지 설정된다.
- Android 8.0 이상에서는 채널 중요도를 대신 설정한다.
- setContentIntent를 사용해서 알림을 탭했을 때 반응을 설정한다.
- setAutoCancel을 사용해서 알림을 탭하면 자동으로 알림이 삭제되도록 설정한다.
- setCategory를 사용해서 시스템 전체 카테고리를 설정한다.
- 방해금지 모드를 위한 것으로, 해당 Notification의 카테고리를 설정함으로서 방해금지모드일 때 Notification을 띄울지 말지 설정할 수 있다.
- 더 자세한 사항은 공식 문서의 방해 금지 모드를 참고할 것.
- Notification 보여주기
- notificationId를 전달하여 Notification을 띄운다.
- 해당 id가 같은 경우, 한 번 더 notify()를 띄웠을 때 해당 알림이 업데이트된다.
- 업데이트 외에도 id를 이용해서 cancel()을 호출해 삭제할 수 있다.
최종 코드.kt
class FirstActivity : AppCompatActivity() {
private lateinit var binding: ActivityFirstBinding
companion object {
const val CHANNEL_ID = "CHANNEL_ID"
}
override fun onCreate(savedInstanceState: Bundle?) {
super.onCreate(savedInstanceState)
binding = ActivityFirstBinding.inflate(layoutInflater)
setContentView(binding.root)
// Notification 만들기 전 채널 만들기
// Application 등으로 이동 가능
createNotificationChannel()
// 버튼을 클릭하면 알림 권한 체크
binding.button.setOnClickListener {
checkNotificationPermission()
}
}
private fun createNotificationChannel() {
// Android 26 이상부터 채널 만들기
if (Build.VERSION.SDK_INT >= Build.VERSION_CODES.O) {
val name = "알람 테스트 제목"
val descriptionText = "알람 테스트 설명"
val importance = NotificationManager.IMPORTANCE_DEFAULT // 중요도 설정
val channel = NotificationChannel(CHANNEL_ID, name, importance).apply {
description = descriptionText
}
// NotificationManager 를 호출하여 채널 생성
val notificationManager: NotificationManager =
getSystemService(Context.NOTIFICATION_SERVICE) as NotificationManager
notificationManager.createNotificationChannel(channel)
}
}
   private fun showNotification() {
        /**
         * 1. Intent 설정: SecondActivity로 이동
         * */
        val intent = Intent(this, SecondActivity::class.java).apply {
            flags = Intent.FLAG_ACTIVITY_NEW_TASK or Intent.FLAG_ACTIVITY_CLEAR_TASK
        }
        // FLAG_ACTIVITY_NEW_TASK -> 앱의 기존 작업 및 백스택에 추가되는 대신 새 작업을 시작
        // FLAG_ACTIVITY_CLEAR_TASK -> 백스텍이 생성되어 뒤로 및 위로 버튼에 관한 사용자의 기대가 유지

        val pendingIntent: PendingIntent =
            PendingIntent.getActivity(this, 0, intent, PendingIntent.FLAG_IMMUTABLE)

        /**
         * 2. Notification 구성
         * */
        val builder = NotificationCompat.Builder(this, CHANNEL_ID)
            .setSmallIcon(R.drawable.ic_launcher_foreground)
            .setContentTitle("My notification")
            .setContentText("Hello World!") // 알림 구성 설정
            .setPriority(NotificationCompat.PRIORITY_DEFAULT) // 우선순위 설정
            .setContentIntent(pendingIntent) // Intent 설정(탭 시 해당 intent로 이동)
            .setAutoCancel(true) // 알림을 탭하면 자동으로 알림 삭제
            .setCategory(NotificationCompat.CATEGORY_MESSAGE)
        // 시스템 전체 카테고리 설정
        // -> 방해 금지 모드 설정했을 때 해당 Notification의 Category 설정
        // ex. CATEGORY_ALARM, CATEGORY_REMINDER, CATEGORY_EVENT 또는 CATEGORY_CALL

        /**
         * 3. Notification 보여주기
         * */
        val notificationId = "${System.currentTimeMillis()}".hashCode()
        with(NotificationManagerCompat.from(this)) {
            // notificationId is a unique int for each notification that you must define
            notify(notificationId, builder.build())
        }
    }
// 권한 요청 Launcher
private val requestNotificationPermissionLauncher = registerForActivityResult(
ActivityResultContracts.RequestPermission()
) { isGranted ->
if (isGranted) {
// 권한 허용 시
showNotification()
} else {
// 거절 시
showPermissionDenySnackBar()
}
}
// 이미 권한을 허용한 경우인지 확인
private fun isAlreadyGranted(permission: String) =
ContextCompat.checkSelfPermission(
this,
permission
) == PackageManager.PERMISSION_GRANTED
// 이전에 권한 요청을 거절한 경우인지 확인
private fun isRationale(permission: String) =
ActivityCompat.shouldShowRequestPermissionRationale(this, permission)
// Notification 권한 확인
private fun checkNotificationPermission() {
when {
// 이미 허용했으면 Notification 띄우기
isAlreadyGranted(POST_NOTIFICATIONS) -> showNotification()
// 이전에 이미 거절했으면 다이얼로그 띄우기
isRationale(POST_NOTIFICATIONS) -> showRationaleAlertDialog()
// 그 외에는 권한 요청
else -> {
// POST_NOTIFICATIONS 권한이 있는 TIRAMISU 버전 이상이면
if (Build.VERSION.SDK_INT >= Build.VERSION_CODES.TIRAMISU) {
// 권한 요청
requestNotificationPermissionLauncher.launch(POST_NOTIFICATIONS)
} else {
// 다이얼로그 띄우기
showRationaleAlertDialog()
}
}
}
}
// 권한이 왜 필요한지 설명 후 설정하기에서 권한 변경 권장
private fun showRationaleAlertDialog() {
MaterialAlertDialogBuilder(this)
.setTitle("휴대폰 알림 설정이 꺼져 있어요")
.setMessage("설정 페이지에서 먼저 알림 허용을 해주세요")
.setNeutralButton("취소") { _, _ ->
}.setPositiveButton("설정하기") { _, _ ->
openAppSetting() // 설정하기로 이동
}.show()
}
// 무시했을 경우 띄워줄 Snackbar
private fun showPermissionDenySnackBar() {
Snackbar.make(
binding.root,
"권한이 허용되어야 알림 설정이 가능해요!",
Snackbar.LENGTH_SHORT
).show()
}
// 앱 설정 페이지로 이동
private fun openAppSetting() {
val intent = Intent(Settings.ACTION_APPLICATION_DETAILS_SETTINGS)
.setData(Uri.parse("package:${BuildConfig.APPLICATION_ID}"))
startActivity(intent)
}
}
이렇게 하면 다음처럼 동작한다.
PendingIntent
PendingIntent
PendingIntent에 대해서 위에서 앱의 프로세스가 종료되었을 때에도 전달할 수 있도록 동작한다고 서술했다.
다만 이슈도 있고, 헷갈리는 부분이 많아서 따로 서술..
PendingIntent는 알림을 탭했을 때 Activity를 실행할 때 뿐만 아니라 여러 곳에서 쓰이고,
getActivity(Context, int, Intent, int) 외에도 getActivities(Context, int, Intent [], int), getBroadcast(Context, int, Intent, int), getService(Context, int, Intent, int)가 있다.
첫 번째, 세 번째 파라미터인 Context, Intent는 예제가 있어서 거의 실수할 일 없이 넘어가지만,
보통 문제가 발생하는 지점은 두 번째, 네번째 파라미터에 해당하는 requestCode와 flags 값이다.
먼저 두 번째 파라미터인 int의 경우 requestCode를 의미하는데,
고정해도 될 때가 있고, 고유한 Code로 설정해야 할 때가 있다.
만약 위의 예제처럼
"Notifiaction을 탭하면 MainActivity로 이동한다."가 요구사항이라면
단순히 requestCode를 고정해도 상관은 없다.
그러나 Notification이 여러 개이고, Notification마다 MainActivity로 이동은 하되
putExtra 등으로 데이터를 주어서 약간은 다르게 보여주어야 할 때(즉 개별 동작이 필요할 때)
intent만 다르게 한다고 해서 되는 게 아니라 requestCode도 다르게 해주어야 한다.
그렇지 않으면 이동은 하는데 원하는 데이터가 나오지 않는 등 원하는 대로 동작하지 않는다.
실제로 아래처럼 putExtra를 주었는데도
requestCode를 0으로 두면
SecondActivity에서 getStringExtra로 뽑을 때 null이 나오더라..
        val intent = Intent(this, SecondActivity::class.java).apply {
            flags = Intent.FLAG_ACTIVITY_NEW_TASK or Intent.FLAG_ACTIVITY_CLEAR_TASK
            putExtra("KEY", LocalTime.now().toString())
        }

        val pendingIntent: PendingIntent =
            PendingIntent.getActivity(this, LocalTime.now().hashCode(), intent, PendingIntent.FLAG_IMMUTABLE)
        // requestCode를 고정 값으로 설정 시 getStringExtra에서 값이 들어오지 않는다.
다음으로 마지막 파라미터 int 값은 flags, 인데
이전에 requestCode가 같은 PendingIntent가 있다면, 이를 취소하고 새롭게 할지, 변경할 지 등등을 설정하는 옵션이다.
- FLAG_CANCEL_UPDATE: 기존 PendingIntent가 이미 존재하는 경우 취소하고 새롭게 생성한다.
- FLAG_UPDATE_CURRENT: 기존 PendingIntent가 이미 존재하는 경우 이를 유지하되, 추가 데이터를 이 새 Intent에 있는 것으로 대체한다.
- FLAG_ONE_SHOT: 이 PendingIntent를 한 번만 사용할 수 있다.
- FLAG_NO_CREATE: 기존 PendingIntent가 존재하는 경우 회수한다.
- FLAG_IMMUTABLE: 생성된 PendingINtent는 변경 불가능해야 한다.
- FLAG_MUTABLE: 생성된 PendingIntent는 변경 가능해야 한다.
이슈: One of FLAG_IMMUTABLE or FLAG_MUTABLE be specified
flags는 FLAG_UPDATE_CURRENT로 하면 될 줄 .. 알았..으나..
java.lang.IllegalArgumentException: com.bibbidi.myapplication: Targeting S+ (version 31 and above) requires that one of FLAG_IMMUTABLE or FLAG_MUTABLE be specified when creating a PendingIntent.
Strongly consider using FLAG_IMMUTABLE, only use FLAG_MUTABLE if some functionality depends on the PendingIntent being mutable, e.g. if it needs to be used with inline replies or bubbles.
버전이 31 이상이면 PendingIntent를 생성할 때 flags에 FLAG_IMMUTABLE 혹은 FLAG_MUTABLE을 사용하라고 한다.
그러면서 FLAG_IMMUTABLE 사용을 강력히 권장한다고 함..
때문에 마지막 Flags를 FLAG_IMMUTABLE 혹은 FLAG_IMMUTABLE or FLAG_UPDATE_CURRENT로 해두면 에러는 뜨지 않는다.
그러나 버전 23부터 해당 Flags를 지원하기 때문에 경고줄까지 없애고 싶다면
minSdk를 23으로 바꾸거나 다른 조치를 취해야 하는 것으로 보인다.
'Android' 카테고리의 다른 글
| [fix] AlarmManager와 Doze 모드 (1) | 2023.07.27 |
|---|---|
| [TIL/개념] Hilt로 의존성 주입하기: 개념 + 겪은 이슈 정리 (6) | 2023.07.12 |
| [적용기] Clean Architecture는 정말 좋을까? (2) | 2023.05.13 |
| [적용기] MVVM ViewModel과 AAC ViewModel (4) | 2023.05.10 |
| [TIL/개념] Android의 Context와 ApplicationContext (0) | 2023.04.30 |